I know, two posts in the one day!! Blogger is playing nice so I thought I'd share one more project...You'll have to excuse the bad photo, I had to use the flash and only had time to take the one photo...the tray (and a new card kit) had to be posted asap : )
I've used lots of Collections papers and chipboard, the leaves have been covered with hand-dyed muslin (using GM). The tray was dry-brushed with gold acrylic paint
and rubbed with Distress ink (Vintage Photo) If you happen to have gone to the
Craft shows in Brisbane or Sydney, you may have seen it at the Craft Queen stand recently... Enjoy your day, whatever you may be doing, and thank you for visiting me : )
Showing posts with label acrylic paint. Show all posts
Friday, 22 June 2012
And a Tray
Labels:
acrylic paint,
buttons,
chipboard,
Collections,
Craft Queen,
Darkroom Door,
ribbon,
stamping
Friday, 17 February 2012
CASEing
Stampotique's current challenge (#48) is to CASE one of the DT members, and my DT member of choice is the fabulous Kate Crane. I got to play with a couple of new stamps for this project (courtesy of Stampotique Original's blog hop last year, thank you Carol)
I used THIS image stamped onto wc paper and coloured with wc pencils, and THIS great sentiment, both stuck using some foam tape for added dimention, plus some bubble wrap, a toilet roll tube (for the big circles), a fairly big brush, plus lots of acrylic paints, and some machine sewing around the edges. I also added some painted old book pages for the top and bottom edges. The heart was drawn onto wc paper and coloured in with wc pencils...isn't Hug Monster a cutie!!!
Thanks for visiting, and if you get a chance, there's still a few days to take part in this challenge, for all the details visit the blog HERE : )
Tuesday, 14 February 2012
Happy Valentine's Day
I know, I really should try to spread out my posts more evenly, but I have to strike while the stamps are hot...
Here is a tag I made for my Valentine...Shhhh, don't tell my DH LOL
I've used an Alterations die to cut my tag, onto which I've stamped a variety of images using Archival ink (jet black). The cogs, hot air balloon, and the word "adventure" are all from THIS set of Darkroom Door stamps, the heart images are from a Prima clear set, the "ten things I love about you" is from THIS set, and the eyes are from a sheet by Time 2 Stamp.
The letters for YOU are from this Collections sheet of alphas, and the words "are my" were cut out from an old book page. You can find the tiny red rhinestone stars HERE and the satin seam binding is HERE. The larger rhinestones (used on the cogs) came out of the Prima pack of stamps.
For the heart (which I stuck to the bottom left hand corner on the reverse of the tag) I used a chipboard shape from a Collections sheet, covered it with texture paste, painted it with brown acrylic paint, and once dry, I rubbed some Brilliance ink (platinum planet) onto the ridges, the heart was then stuck to a piece of torn wc paper painted with Twinkling H2Os.
Thanks for stopping by, and enjoy your day, whatever you may be doing...
Wednesday, 1 February 2012
A New Month...
And a new challenge over at CRAFT QUEEN's blog...
And these are my samples, 3 very different ATCs (Artist Trading Cards). I wanted to use the great Crafter's Workshop 6" templates, to show a couple of looks that can be achieved with them.
For this next one, I started with a white ATC blank, and laying THIS template, I carefully added some texture paste over the top (just like icing a cake) and removed the stencil, cleaning it up (the stencil) straight away. I allowed the texture paste to dry overnight, and then I painted over the ATC with some blue and some bronze acrylic paints. I then added the image of the ballerina (stamped onto tissue paper and stuck on with Modge-podge) from THIS set of stamps
The sentiment is from an old Teresa Collins stamp. You can find the beautiful shell heart HERE, and the leaf HERE.
For the next ATC, I started out with some white cs, and THIS template, onto which I sprayed a couple of coats of blue Glimmer Mist, allowing it to sit and puddle around the stencil, once dry, I stamped one of the tree images from THIS set of stamps, and trimmed it down to fit inside my beige ATC blank.
And these are my samples, 3 very different ATCs (Artist Trading Cards). I wanted to use the great Crafter's Workshop 6" templates, to show a couple of looks that can be achieved with them.
For this ATC, I started by carefully laying THIS template over some white card, and dabbing some alcohol ink (I used StaZon teal ink) over the pattern. I then stamped the mesh image from THIS set of stamps using the same ink. The sentiment from THIS WORD BLOCK was stamped with black ink and stuck using foam squares. I raided my scraps box and found some corrugated cs, which I dry-brushed with some bronze metallic paint, and layered that over a piece of punched and watercoloured paper. I added a yellow button (from a past kit), and a little red wire : )
For this next one, I started with a white ATC blank, and laying THIS template, I carefully added some texture paste over the top (just like icing a cake) and removed the stencil, cleaning it up (the stencil) straight away. I allowed the texture paste to dry overnight, and then I painted over the ATC with some blue and some bronze acrylic paints. I then added the image of the ballerina (stamped onto tissue paper and stuck on with Modge-podge) from THIS set of stamps
The sentiment is from an old Teresa Collins stamp. You can find the beautiful shell heart HERE, and the leaf HERE.
For the next ATC, I started out with some white cs, and THIS template, onto which I sprayed a couple of coats of blue Glimmer Mist, allowing it to sit and puddle around the stencil, once dry, I stamped one of the tree images from THIS set of stamps, and trimmed it down to fit inside my beige ATC blank.
I stamped the sentiment (also from the same set of stamps) onto a scrap of vellum paper, adding a little orange coloured TINY TWINE, a square SHELL BUTTON, some butterflies made with THIS punch, and a tiny bit of a sripe ribbon
If you've never made artist trading cards before, they are a great size for using up bits and pieces, plus, you can try out new techniques in a small scale.
And just in case you didn't pick up on it, this month's challenge involves using the word "love", some twine, and a button. For all the details, and to see the rest of the DT projects, have a look HERE, and don't forget, your entry can be anything crafty, a card, layout, ATC, OTP project, or a sewing project, as long as it incorporates the required criteria.
Thanks for visiting me, I hope I have inspired you to play : )
Labels:
acrylic paint,
ATCs,
buttons,
Challenge Blog,
Craft Queen,
Glimmer Mist,
ribbon,
stamping,
stencils,
texture paste.,
twine,
vellum
Monday, 19 December 2011
Inkurable Stampers Holly Challenge
Hello again, I said I would be back : )
Here is my project for this month's theme over at Inkurable Stampers...
I started with a kraft coloured card blank, dry-painted it with silver acrylic paint, and stamped Darkroom Doors Flourish onto it using Adirondack Lights ink (juniper) also applying it directly to the edges. I then glued some red mesh ribbon to the front and the wreath image (containing the holly, from Darkroom Door Christmas Montage sheet) using foam tape. The tag (made by stamping the script image from a DD set of stamps) was in my scraps box already. I glued the tiny ric-rac to the edge of the card, and added some DM to the wreath.
I have a few more projects that I want to share but haven't taken photos of them yet...they include a weeping angel (for the Whovians out there!) and a moose : ) Thanks for visiting me, I hope you're making time to be creative, if I can do it, so can you...
Here is my project for this month's theme over at Inkurable Stampers...
I started with a kraft coloured card blank, dry-painted it with silver acrylic paint, and stamped Darkroom Doors Flourish onto it using Adirondack Lights ink (juniper) also applying it directly to the edges. I then glued some red mesh ribbon to the front and the wreath image (containing the holly, from Darkroom Door Christmas Montage sheet) using foam tape. The tag (made by stamping the script image from a DD set of stamps) was in my scraps box already. I glued the tiny ric-rac to the edge of the card, and added some DM to the wreath.
I have a few more projects that I want to share but haven't taken photos of them yet...they include a weeping angel (for the Whovians out there!) and a moose : ) Thanks for visiting me, I hope you're making time to be creative, if I can do it, so can you...
Labels:
acrylic paint,
Cards,
Christmas Cards,
Darkroom Door,
Inkurable Stampers,
ribbon,
stamping
MMM or My Mess Monday!
There is a craft table under there somewhere...I swear : )
I've been working on a few projects, and because I've been time-poor, I haven't put things away as I usually like to do...instead, my crafting area has shrunk to a tiny clearing, but no more, I just had a little clean up, and I thought as a reward I would do a couple of projects...I have so many UFOs (unfinished objects for the uninitiated) but new projects are so much more fun, right?
Here's project No 1 for the Simon Says Stamp and Show challenge blog, the criteria being to show some depth...
I've used a Collections chipboard thingy (cabinet card ?), some brown acrylic paint, Distress ink (tumbled glass). The little girl is one of Tim Holtz images, stamped onto acetate with StaZon ink (jet black) which I had also coloured with alcohol inks (currant and ginger) as well as some viridian acrylic paint, and a coat of white acrylic for the underside. The "doors" are held in place by some TH tissue tape, and I added a little wc paper painted with Twinks H2O (ginger peach), and a scrap of cotton lace (from Craft Queen) The word is a stamp (from my scraps box)
I hope I have made it on time for this challenge...
I'll be back shortly, in the meantime, smile, it makes others wonder what you've been up to LOL
Monday, 31 October 2011
Happy Halloween Mummy
Here's a new re-do on another Bratz doll...I've had the idea to do this for ages, and it's not as though I don't have other projects in my "to do" list, but I really wanted to have this done in time for Halloween, so here she is...I covered her face with matte medium, then painted her with white acrylic paint, and her eyes were drawn in with a couple of Zig pens (Zig Millenium 0.3 and 0.8)
I tore a few thin strips of calico and used PVA glue to stick them in place, adding some acrylic paint in a random fashion : )
And this is the family portrait, I hope you like my new addition to the family...Thanks for visiting and I hope your Halloween is a good one!
Tuesday, 25 October 2011
Re-Altered Box
This month's theme over at Alter-It-Monthly is "boxes", and although I had lots of different boxes to choose from, I settled on this one, because frankly, it just needed a new make-over!!!!
So here is the "old" (It was originally a green metal, which I painted and decorated over 6 years ago!):
And after a couple of coats of matt medium, and some acrylic paint and some texture paste (using a 6"x6" Crafters template) :
Some more acrylic paint, and lots of drying time...
Now I don't have to hide it any more LOL...
Thanks for visiting, I hope you come back soon, until then, have a creative day : )
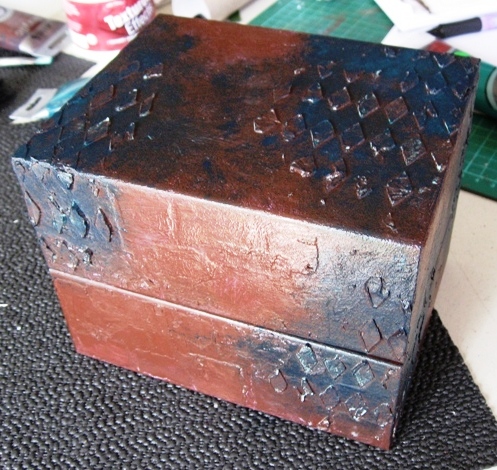
So here is the "old" (It was originally a green metal, which I painted and decorated over 6 years ago!):
And after a couple of coats of matt medium, and some acrylic paint and some texture paste (using a 6"x6" Crafters template) :
Some more acrylic paint, and lots of drying time...
Now I don't have to hide it any more LOL...
Thanks for visiting, I hope you come back soon, until then, have a creative day : )
Labels:
acrylic paint,
Alter It Monthly,
template,
texture paste.
Sunday, 23 October 2011
Messy Fun
This is my entry to the latest theme over at the Stampotique Challenge Blog...lots of ink (Adirondack lettuce) lots of acrylic paint (red, purple, yellow) & some wc paints and wc pencils...
I've used a couple of my most recent acquisitions, Perl and Miss Snottie, some bubblewrap, some Kaiser tiny letter stickers, foam tape for Miss Snottie, a wooden heart-shaped button and some bakers' twine(button and twine are from my Craft Queen stash, thanks Nicole)
Tag measures about 6.5"x3" approx.
Now I better go and clean up my craft table, I hope you're enjoying your weekend, thanks for stopping by... : )
Tag measures about 6.5"x3" approx.
Now I better go and clean up my craft table, I hope you're enjoying your weekend, thanks for stopping by... : )
Tuesday, 27 September 2011
Hello Sweety...
I had the chance to make a couple of cards this afternoon while watching a Doctor Who DVD with DD, & if you are a Whovian, you will get the reference in my title...
Anyhow, here is my entry for Stampotique's challenge blog, last minute, but at least I made it LOL
I started with a white card base, doodled in the B&W edge, stamped Miss Snottie (one of my newest purchases, this was her first outing!) onto a piece of scrap white cs & cut out,and as the theme calls for B&W and a hint of colour, I added a painted piece of mesh (I think it's called plasterers tape?) and the sentiment (Carolee's red letter stickers) I used some foam tape for added dimention...I hope the school holidays are being kind to you too : )
Anyhow, here is my entry for Stampotique's challenge blog, last minute, but at least I made it LOL
I started with a white card base, doodled in the B&W edge, stamped Miss Snottie (one of my newest purchases, this was her first outing!) onto a piece of scrap white cs & cut out,and as the theme calls for B&W and a hint of colour, I added a painted piece of mesh (I think it's called plasterers tape?) and the sentiment (Carolee's red letter stickers) I used some foam tape for added dimention...I hope the school holidays are being kind to you too : )
Wednesday, 14 September 2011
How Long Has It Been...
...since you used any eyelets? For me, it's been forever LOL, so it was great to have a play this morning using some rather quirky shaped eyelets that I had forgotten were in my stash. This is my entry to this month's theme over at Sarah's Inkurable Stampers challenge blog:
I started by cutting a tag shape out of purple cs, I stamped the Art Declassified image onto some white cs and stuck that to the tag, I then added the olive cs scallop edge (TH Alterations die), I was going to set the eyelets onto the orange strip of cs but thought they would look too plain, so I added bits of painted cs out of my scraps box and then set them with my crop-a-dile (which I use all the time to make holes, but I haven't used in ages to set an eyelet!!!) The sentiment is a favourite of mine(and so true!) and it's from an ATC booklet I bought ages ago from The Stamping Queen., both the sentiment and the strip of orange cs were stuck on using foam tape for extra dimention. I was going to leave it at that, but the purple section looked too empty, so I brought out some white acrylic paint and my favourite Darkroom Door b'ground stamp and voila! no more empty space : )
I then added some orange and some red ribbon, as well as a white button, all from Craft Queen (because I like to rub shoulders with royalty LOL) So now that I found my stash of eyelets, I wonder what else I can use them on?
Don't forget you still have time to join in with this fun challenge until the end of the month...
And you also have until the 18th of this month to vote for the top 6 entries to the Stampbord competition...You need to "like" Stampbord, and then go to the gallery and choose your favourite entry out of the 6 there... Thanks for your visit, now go, create something : )
Monday, 12 September 2011
Odd Family Tree...
A little while ago I bought one of these trays, and the hardest part for me was deciding on the look I wanted...would I go shabby chic? or vintage? or even Steampunk?...it's a great design, so easy to work with, and I finally went with the family tree idea, prompted by this month's theme over at Alter-it-Monthly.
I started by getting my scraps box out and choosing a variety of pps, I then traced the shapes I needed b4 sticking the layers (of the tray) together, and painted the whole thing with a nice chocolate brown acrylic paint. I used images from Stampotique Originals ( Head, Gooseneck, Eric, Perl, Smile, Snooty, and Moth Fab (thanks Shirley for sending me some of Moth Fab's and Eric's stamped images for me to play with) , Tim Holtz (Mini Halloween), WRMK, and the bat at the top of the frame is by Imaginisce. The tree was made from card, cut free-hand, and covered in "appropiate" text : ) I added some Distress ink (Vintage Photo) and I also added some twigs all the way from my garden... The Plaque is from a TH Alterations set, and the "family" is a stamp, but I can't remember the manufacturer, the lace was dyed with GM, and stuck to the back with ds tape, if you squint you may be able to see that I also added a couple of cobwebs stamped onto acetate (there's one behind the tree, and another sandwiched between Snooty and Perl) I added some lovely red acrylic paint to finish it off (that was my DD's idea, and I'm getting worried about her, she's getting more like me with each passing day LOL)
So there you have it, the Odd Family tree, I hope you like it...and don't forget, you have until the end of the month to join in with this great challenge at Alter-it-Monthly
PS. Thank you to those of you who have taken the time to vote for my entry to Stampbords Facebook competition, voting finishes on the 18th of this month...If you'd like to vote, you can find the details HERE
Labels:
acrylic paint,
Alter It Monthly,
Printers' Tray,
stamping
Subscribe to:
Posts (Atom)