Showing posts with label Stampbord. Show all posts

Tuesday, 14 February 2012

Swapping Much?


I've just mailed this month's Darkroom Door ATC swaps (you can find all the details for the current swap HERE) and as usual, I forgot to take a photo of the actual ATC!   But I did remember to take a photo of the Thank You card I included...


I haven't played with Stampbord tiles in a long while, so I went ahead and used one as the centrepiece for this card.
I covered the tile with StaZon ink (teal) and stamped the flower from THIS set of Darkroom Door stamps, and the sentiment from THIS set.   I then used my scratch tool to add the highlights to the images, and then gave the tile a coat of DM for the glossy finish. 


I then used some Distress ink (vintage photo) and the splatter image from THIS set of stamps, and stamped it onto my base card to create the background.
I just love the new WEBBY RIBBONS from CRAFT QUEEN, so I used some of it to anchor the image to the front of the card.    The butterflies were punched out of wc paper and text using THIS punch.

I so enjoy making ATCs and receiving the beautiful returns, it's a great way to share your own creativity, and a fabulous way to see how others use the beautiful images... If you get a chance, why not take part?     Thank you for visiting, I hope you come back soon   : )   

Saturday, 19 November 2011

Zutter Books and Stampbord

A while ago I entered the fabulous Stampbord competition, and I chose to use a couple of Zutter Cover-Alls (bamboo spine) books, which at 3"x4" are the perfect size to use with the ATC-sized Stampbord pieces.      We could not share our entries in our blogs at the time, so I'm sharing mine now...I had two entries, this first one made it through to the finals:


I started by covering the book with torn pieces of masking tape, then I gave the whole book a coat of acrylic paint (viridian) and the edges were painted with burnt umber  and bronze.    I then got one of those fun ATC-sized Stampbord pieces, and using some StaZon inks (mustard, rusty brown, blazing red) covered the entire piece, I then used various stamps from these Darkroom Door sets (Steampunk, Gothic Arches, Prague Vol 2 ) using StaZon ink (jet black) & then I scratched out some highlights using one of the Stampbord scratch knives.       I covered the whole Stampbord piece with a coat of DM to give it that nice shiny finish, and I made the insert using plain copy paper, cut to size and hand-sewn together.

For my second entry I used basically the same products, giving the cover a coat of viridian acrylic paint, and the background on the ATC-sized Stampbord piece was created by using watercolour paint and a sprinkling of salt, I then used this image from Stampotique Originals, as well as images from these Darkroom Door sets (Love Birds, Mail Art)     The motif in the top corner was drawn in using a Zig pen (0.5) and all the highlights were scratched using a Stampbord scratching tool, this entry didn't make it into the top 6, but I'm very happy with how both entries turned out just the same : )


And if you're wondering why I didn't cover this one with a coat of DM, it's because I really like the matte finish : )        Thank you for visiting me, and a big thank you to those of you who voted for my entry into the competition.   You can still see all the beautiful entries HERE.

And talking about competitions, don't forget to enter this month's Craft Queen challenge, just use some stamping, and some pink ribbon and email a photo of your project (which can be anything at all)    For all the details, go HERE and good luck : )
Thursday, 8 September 2011

Stampbord Competition

Are you on Facebook?    If you are, check out the top 6 entries to the great Stampbord competition...I put in 2 entries, one got through, and you are able to vote for the entry you like by "liking" it on FB...   This is my entry:  I hope you "LIKE"it  : )
Enjoy your day, and thank you for visiting my palace...

Wednesday, 24 August 2011

Bright and Beautiful...

...is the theme for this month's challenge over at Crafty Individuals Blog, and I've just finished my entry.
I've used one of my favourite surfaces to stamp on, a 1" square piece of Stampbord, the background was painted with Garnet Twinks H2Os, and the image stamped using Archival ink (jet black), I then scratched some highlights and added a coat of DM, added the bail and it's now a pendant.     Here are the photos to prove it   : )


I hope it's "bright and beautiful" enough to qualify...

Wednesday, 20 July 2011

Time Is Running Out...

You only have until August 31, 2011 to enter STAMPBORD's fun competition...Have a look HERE for all the details and to have a peek at the very generous prizes!!!    You need to have a Flickr account to upload your entry HERE, so what are you waiting for, grab your STAMPBORD tiles and have a play.


If you are new to STAMPBORD tiles, HERE is a tutorial for you (featuring some of the tiles pictured above, all stamped images are from Darkroom Door stamps range) and you will find many more great ways to use STAMPBORD products in their Idea Gallery, as well as in their Featured How-Tos, so make sure you take a look, have a play, and enter, for a chance at winning those fabulous goodies!

Tuesday, 28 June 2011

Canvas Colours

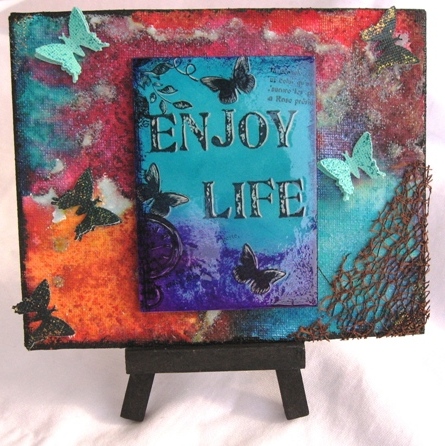
Just recently I have found a new (to me) challenge blog, Alter It Monthly, which currently has the theme of canvas for this month, and I almost forgot to take part!!!     But I have just finished photographing my mini canvas (I'm running out of display space in my home!)   It is roughly 6"x4", and I've used an ATC sized Stampbord piece as well as some new stamps.       The canvas was cut to size, and given a watercolour (Twinks H2Os) and salt background, I then added some Pixie dust to any white areas which were showing.
While this was drying I covered the Stampbord piece with StaZon inks (I've used Teal Blue and Iris) and when dry, I stamped my chosen images (words are from THIS Darkroom Door set, butterflies are from THIS set) and I used my brad new set of Pink Paislee stamps around the edges of the Stampbord.
I also added some butterflies punched out of some painted canvas, some of THIS ribbon, and a little glitter here and there.    The Stampbord piece has a coat of DM to give it a nice glossy finish.


  If you get a chance, there's still a couple of days left to join in with this great challenge, and there's always next month, right?       Thank you for visiting me, now go, CREATE something : )

Tuesday, 24 May 2011

Playing With Dominoes.

A few days ago I used a stamped domino for my entry into this month's Crafty Individuals challenge HERE, and Shirley wanted to know how I prepared the domino...   It's a very simple process, just get your domino & wipe it over with some window cleaning fluid (I use Windex, which is also what I use for cleaning my stamps, funnily enough I don't do windows with it, LOL)    I'm sure you could also use something like methylated spirits, but Windex work really well, as all you're trying to do is to get rid of any oily finger marks etc.
These are the dominoes I have (picked them up at a garage sale for $1) and they have a tiny screw which I removed fairly easily with a pair of pliers prior to cleaning, to make it eazy for the domino to sit flat on my card...


 So, after removing the tiny screw, I just wiped the domino with some Windex, let it dry, and covered with StaZon ink (you could also use Sharpies to colour your domino, alcohol inks, or even acrylic paints)


I gave the ink a few minutes to dry fully, and then stamped my image by inking my stamp with black StaZon ink, just make sure you stamp the image and LIFT it straight off to avoid smudging.      I then allowed the image to dry and gave the domino a coat of Dimentional Magic (keep a pin handy to get rid of any bubbles) then just allow the DM to dry and add the domino to your chosen project, I stuck mine down with PVA glue, as it dries clear.      I'll be back with a finished project using this pink domino as soon as I get a chance, but in the meantime have a look at Kimberly Crick's website, which is filled with some great information, and has some gorgeous galleries full of beautiful projects (unfortunately she doesn't sell to overseas visitors, but I live in hope...)    In the meantime I will "Keep Calm, and Carry on"

BTW, are you a fan of STAMPBORD tiles?    Did you know they are having a great competition?    Have a look HERE for all the details, and just in case you've forgotten, they also have a great archive of fun projects HERE

Wednesday, 20 April 2011

A Crafty Bookmark

I've been so busy lately that I've really struggled to set time aside to play, let alone post about it here...But here is my entry for a brand new Challenge Blog over at CRAFTY INDIVIDUALS.      I've used a STAMPBORD square piece, as well as the following stamps from CRAFTY INDIVIDUALS, butterflies, and Once Upon a Time
I started by trimming a piece of leather using a couple of Alterations dies, painting the strip with some white acrylic paint, and stamping the butterflies using jet black Archival ink.      I then covered a square piece of STAMPBORD with red StaZon ink, and I stamped the Once Upon a Time image twice, once onto a scrap piece of cardstock, and a second time onto the STAMPBORD square.       I highlighted the little girl image with a scratch tool and covered the square with a coat of DM.      The words were cut out and matted with some pp, and the fabric flowers were cut out using another Alterations die, with a gem brad as a finishing touch.         This bookmark has now gone to a new home : )   And if you have some time to spare, make sure you visit the CRAFTY INDIVIDUALS blog.


Friday, 18 February 2011

A Leathery Bookmark...

The new theme over at INKURABLE STAMPERS for this month is bookmarks.    In our household there are three very avid readers, so there's always a need for bookmarks, though some of us do the folding-down-the-upper-corner bit (I'm sure I'm not the only one who does that, right?   : )      Anyway, I decided to have a look in my box of bits and pieces, and found an off-cut of grey coloured leather that I thought would make the perfect background for my new bookmark.


I started by cutting the leather to size, I then applied some white acrylic paint, and when dried, I stamped the following stamps using Archival Ink (jet black) masking as required: Victoria's Secret "art definition", Cats life Press "the answer...", Basic Grey "to do" clear stamps, and an oldie clear stamp from Studio Astarte "reading", I then trimmed both edges with an Alterations Die.      I then got a domino sized Stampbord piece and a 1" piece and covered them both with StaZon inks in the following colours: rusty brown, mustard, blazing red, and timber brown.    The images are from THIS and  THIS Darkroom Door sets of stamps, and were stamped using StaZon ink in black.    I then highlighted the images by scratching the tiles, and sealed them with a coating of Dimentional Magic.           The silver chain was salvaged out of a bag of broken/tangled jewellery which my daughter was throwing away a while ago, so that's my bit of recycling for the day  : )       
I hope you are having a great day, wherever you are   : ) 

Friday, 14 January 2011

A Christmas Card Again?

I just realized I forgot all about one of my New Year resolutions, to do a Christmas card a week!    Visit Hazel's Blog to find out more...
Anyway, here is my first Christmas card for the year...


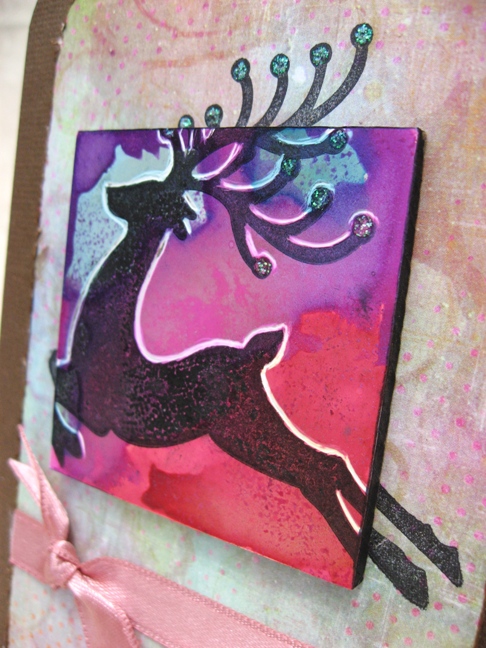
I used a dark chocolate piece of cs as my base, some Prima pp, some pink ribbon, and both the sentiment and the deer are from THIS Darkroom Door set I used a 2" square shaped Stampbord tile, painting it with a variety of Twinkling H2Os wc paints, allowed to dry,  and stamped the image using  black StaZon ink, I then scratched the edges of the reindeer to add the highlight.    I then carefully worked out the placement of the tile and stamped the image onto my base pp, adding the Stampbord tile and some KG as a finishing touch.   
Thanks for visiting my humble abode : )

Saturday, 23 October 2010

Gothic ATCs...

A while ago, SARAH asked me if I'd like to do a Stampotique Goth kids swap (and a kind of pouch/container to put them into) with her, & of course I said YES!      These are the ones I made for her...some funny, some creepy & some that I forgot to take photos of!  LOL.    HERE are the ones she made for me, they look stunning!       It only took her 4 months to get hers finished, but boy, was it worth the wait!!!! : )   I just hope she liked mine as much as I love hers....but next time we swap, I might just take my
 time LOL : )              Don't forget to come back tomorrow to check out INKURABLE STAMPERS GOTHIC ARCH # 21, which I had fun creating : )   But in the meantime, have a look HERE for some information on yours truly (I didn't realize I used LOL so often!)   LOL (sorry, just couldn't help myself  : ) Thank you for your visit, and I hope you come back soon...