Showing posts with label Gothic Arch. Show all posts

Thursday, 16 June 2011

Gone Gothic...

Yes, I know!   Another Gothic arch...but I just enjoy playing with that shape so much, so when I read that Simon Says Stamp and Show's theme for this week was "torn/distressed" I just had to!      I've used some Tim Holtz paper, the sentiment from THIS TH stamp set, the word"explorer" and the image of the man are both from THIS Darkroom Door set (stamped onto acetate with black StaZon ink, I also dry-brushed some gold acrylic paint onto the underside of the word)    The word was then stuck to a painted puzzle piece,  I've also added a couple of pewter brads and some butterfly punches (with some wild honey Distress Stickles on their wings)      All edges have been torn and/or distressed (with my trusty and very used MM distresser), for the hole over the sentiment I just made a small cut with my craft knife and began tearing the section out, then inked all the edges with Distress ink.
And here are the photos to prove it : )


Sunday, 12 June 2011

Inkurable Stampers June Entry

I told you I had some time to play today LOL, so here is my entry to this month's Inkurable Stampers theme of "Spots, Dots, and Circles"

I've been missing last years Gothic Arches challenge (also run by Sarah, of Inkurable Stampers) , so decided to use a Gothic Arch shape as the base for my entry (aren't I sneaky???)
I began by painting the arch shape with red, gold,  and bronze acrylic paints, I then stamped some circles (See Dee's) and some splatter (Darkroom Door "Artist" set) using Versafine black ink, and heat-embossed the images with black EP.      I then used the Darkroom Door "Dots" b'ground stamp with some teal acrylic paint.     I then added the sentiment (from Oxford Impressions) and the filmstrip dolls (Cats life Press) both stamped onto white cs and heat-embossed with black EP.    And here are the photos:


I hope you've also had some time to play along...Don't forget, you still have plenty of time left to join in with this Inkurable Stampers challenge...Thank you for visiting me and see you again soon : )

Saturday, 11 December 2010

All Done...

View from the Top

Wooden Beads and Leather Cord


Back Cover

Front Cover
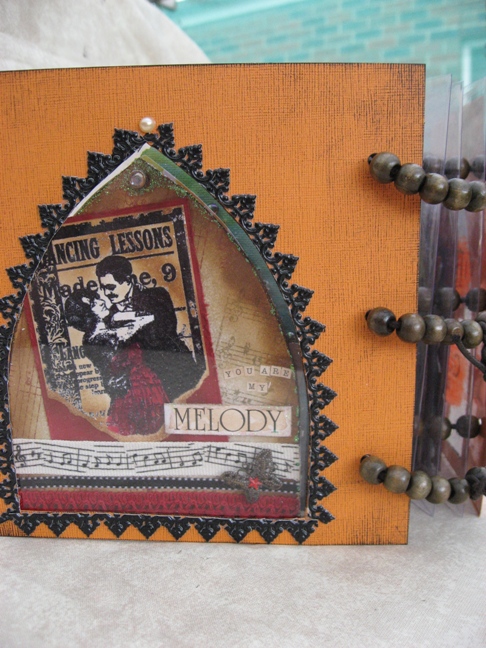
My INKURABLE STAMPERS Gothic arch book is finally finished, though as I took the photos I thought "I really should add the actual themes to each page...", but I'll see how I feel about that idea in a few more days LOL.      I used some A4 sized acetate sheets folded in half, and stuck all 24 arches using ds tape.     The leather cord and wooden beads started life as a belt (I pulled it apart ages ago, and had it stashed away waiting for the right project!)           For the front cover, I cut away a window from the orange cs, and layered that over a clear acetate sheet, stamping the words using black StaZon ink, and painting the reverse side with acrylic paint.   I also added some black German scrap.     Don't forget, you still have time to take part (arches are due by the end of this month)     For all the themes and information check THIS post in Flickr, or THIS POST in the INKURABLE STAMPERS blog  
I have really enjoyed this year-long challenge, and it has made me get reacquainted with some long lost images, which is always good, right?     
There is also the regular challenge at INKURABLE STAMPERS, which this month is "one layer wonders", so if you have the time, why not give it a go  : )     Thanks for your visit, and I hope your Christmas preparations are going well, not long now until Santa comes to town!

Tuesday, 7 December 2010

Final Gothic Arch for the Year

I know, I still haven't finished my Christmas cards, but I had to get this arch done, the theme for the current INKURABLE STAMPERS Gothic arch is MUSIC, and as soon as I read it, I knew exactly what I would do, it's not often that this happens, so I just had to go with the flow!


I used some HOTP pp which my darling daughter bought for me when she went to the Royal Melbourne show a couple of months back, and I also got to use the beautiful music ribbon she purchased at the same time (thank you my darling teenager)    The dancing couple is an image from Crafty Individuals  (CI-068, but for some reason I can't see it in their website, maybe it's been retired), the image was stamped and clear-embossed, then sponged with TH Distress ink, torn at the bottom, and stuck to an ATC-sized red card.    I glued an arch shape cut out of cs to the pp, then distressed the edges (edge distresser and ink) then added the KG.   I then stuck the couple in place with ds tape, and added the coordinating ribbons (all available from CRAFT QUEEN , HERE, HERE and HERE)    I then used some of THESE tiny alphas, they are just the best size for smaller projects (thanks Nicole) and the word "Melody" is from a Darkroom Door word strip.    The metal butterfly and the tiny red star rhinestone are also from CRAFT QUEEN.    And now that the last arch for the year is done, I'll have to work out on a way to display them all!    I've had heaps of fun playing along with these great themes, and I'm really hoping SARAH continues with the arches next year.    Don't forget you can still join in with the challenges...due date is the 31st of this month, so if you're looking for a fun project to do between now and the new year check out all the details HERE.    And don't forget to check out the fabulous Flickr gallery, there's lots and lots of yummy inspiration : )    As always, thank you for your visit, now I'd better get back to those Christmas cards!!!

Tuesday, 16 November 2010

Inkurable Arch # 22

The theme for INKURABLE STAMPERS' Gothic Arch #22 is mythical creatures, and there's so many creatures to choose from, but I decided to create an arch with one of my favourites, a mermaid, as the main feature.   The actual mermaid image is a PSX stamp and  the image was given to me by my good friend LYN a couple of years ago(!) in a swap we both took part in (Thanks Lyn)   Luckily for me, she included 3 images...I used one as my base, and a second one as my main image, which I coloured in with wc pencils and KG, then cut out the mermaid and fish, and used ds foam tape to add more dimention.    I've also used a cb frame from CRAFTY INDIVIDUALS, which I dry-embossed with a TH folder, then painted with acrylic paints, adding some KG. to the grooves.   This was all added to my arch, which was made by painting a sheet of canvas(stuck to some stiff card) with some Twinkling H2Os, trimmed with deco scissors, and hand-sewn with beads.   The sentiment is from THIS DARKROOM DOOR set.    Only two more arches left!    Don't forget this is an ongoing challenge, and you have until the end of the year to take part, for more details visit the Flickr gallery HERE.    Now I'm off to upload  : )    Thanks for your visit, and don't forget to CREATE.

Sunday, 24 October 2010

Inkurable Arch # 21


A few weeks ago I was asked to be a guest designer in Sarah's INKURABLE STAMPERS GOTHIC ARCH challenge, and I was very excited when I found out the theme would be "spooky"  (Sarah, I think you know me too well LOL).      So, here is my arch...
I started by covering my arch shape with a coat of black acrylic paint, and adding a piece of printed paper from THIS BG 6" pad , distressing the edges before sticking it down.
 I then got to work on my tree by getting a lenght of wire, twisting it into shape and covering it with masking tape.     I gave it a coat of brown acrylic paint and then dry-brushed some black paint to add dimention.     I used a sizzix alterations die to cut the fence, sanding it back around the edges, and trimming as necessary to fit around my tree, using black foam tape to stick it in place. 
 I used one of my favourite stamps, Head from HERE stamping him with black Versafine ink and covering the image with clear emossing powder, I then trimmed the image and coloured it in with wc pencils (I added the black circles around his eyes too) using ds tape to fix him to the fence.      I also stamped Gibi 's head, using black Versafine ink & clear embossing powder, trimming the image, adding a bit of wire (to hang from the tree) and sticking in place with foam tape.     Smile was actually rescued from my scraps box, & I think he had been stamped with brown Stazon ink.
 I printed out the sentiment onto white cs and trimmed the words using some decorative edge scissors, using some more foam tape for dimention.     Once everyone was in place I got some red nail polish and did some decorating of my own.     So there you have it, a Gothic arch just in time for Halloween : )
Don't forget this is a year-long challenge, and you can join in at any time.    You'll find all the details HERE, and while there, don't forget to check out the fantastic gallery.

Tuesday, 19 October 2010

A Little Bird Told Me...

Well, actually, it was Sarah of INKURABLE STAMPERS, who told me what the theme for Gothic Arch # 21 is, but you'll have to wait a few days to see it (Sunday 24th, to be exact)       All I will say is that I had heaps of fun designing it, and I can't wait to share it here...    

In the meantime I'll leave you with some cards I made for CRAFT QUEEN using THIS gorgeous card kit aptly named Black Tie.        All the bits and pieces are included (except for the "Thank You" sentiment, which is from THIS Darkroom Door set) and as always with Nicole's kits, it was great fun to work with all the beautiful trimmings.
There are more photos in the CRAFT QUEEN Gallery HERE       Thanks for your visit, now go forth & create : ) 


Wednesday, 13 October 2010

Inkurable Arch # 20


I can't believe we only have another four more arches to go!!!   Where has the year gone, & if that's not scary enough, Christmas is just around the corner!!!!!!!!!!!   Taking a deep breath.....

Anyway, the current theme for the INKURABLE STAMPERS GOTHIC ARCH # 20 is "trains, planes, and  automobiles.        Well, I now know I don't have any train or plane images in my ever-growing stash of stamps, but I do have a few automobiles!   
I started by covering my arch shape with a sheet of pp from a BG 6" paper pad (Indian Summer)  I then stamped the splatter from THIS Darkroom Door set, "art definition" (Victoria's Secret), "A little stop on my art journey" (Catslife Press) and the months stamp is a Hampton Arts 6 foot long stamp set (which I coloured in with a white souffle pen).      I also stamped the "art journey" image onto a puzzle piece die cut, and mounted using foam tape.     I stamped the Darkroom Door car from THIS set onto a scrap of white cs, trimmed closely and mounted to the arch with foam tape, I did the same with the bigger car image (Oxford Impressions)    I added a torn piece of dark green cs to the bottom edge and as a finishing touch, I added  THIS butterfly sequin and the tiny girl image (Collections), and coloured in the images with some pastel pencils...now I'm all caught up again LOL.      Don't forget that this is a year-long challenge, and you can join in at any time.    All the details can be found HERE, with each theme listed HERE.      Happy creating, and thanks for your visit : )
P.S.  My apologies for the scattering of images, Blogger just doesn't like my photos, and always gives me trouble with their placement...

Saturday, 9 October 2010

Inkurable Arch # 19

This is my interpretation for the current INKURABLE STAMPERS GOTHIC ARCH #19, the theme being "All about Me".
I had a lot of trouble trying to narrow down all the stamps I wanted to use, but in the end I thought these were the ones that more closely represented me, my love of ATC's, my love of colour, and my weird sense of humour : )
I began by sponging on different inks onto the plain white arch shape and edging the arch with some KG, I then stamped the flourish (by Autumn Leaves) and coloured it in with my white Souffle pen.    I then stamped the "ATC Evidence of Artistic Life" by Catslife Press, "Artist Trading Card" by Darkroom Door, and "Right Now" by Kaiser, onto a scrap of wc paper, which I then trimmed with a Sissix Alterations die, and edged with some tumbled glass Distress ink.
I then added a bit of ribbon (one of my favourite ribbons, from CRAFT QUEEN), Collections Tiny letter tiles, and a Collections cb heart (coloured with a red Sharpie, covered with KG, and stuck on with foam tape)


I stamped the ART Doll (source unknown),  Original Artwork (Catslife Press), and 100% Mail Art (Time to Stamp) onto wc paper, mounting the images to the arch using foam tape.
The ric rac is from CRAFT QUEEN, the tiny paper flower is Prima, the tiny cb heart is from Collections, and I just  had to add the girl's "glasses", which are punchies.
I'm  really enjoying this great year-long challenge, and you can join in at any time, just visit the Flickr page for all the details, and while you're there, make sure you have a look at the fantastic gallery, there's still 5 more arches/themes to go, and I can't wait to see them all together!!!!
I hope the school holidays treated you well, for us, it went too quickly!   Thanks for visiting my palace, and I hope I have inspired you to use your stash, happy crafting, and see you again soon  : )


Sunday, 19 September 2010

Gothic Arches #16, #17 & #18

Gothic Arch # 16 had the theme of "birds" so I used the beautiful image from the Stampers Anon. set which had just arrived the day before (My prize for last month's entry to INKURABLE STAMPERS challenge of lavender & lime, Thank you Sarah, & Tarisota) For this arch I started by sponging red & yellow Marvy inks onto the b'ground, I then stamped the bird image, as well as the sentiment (from another Stampers Anon. set) with black Versafine ink, adding the ds satin ribbon from CRAFT QUEEN, & the Maya Road leaf pin, also from CRAFT QUEEN.
For the next arch, which is #17, the theme is "metals". I started by painting the shape with brown acrylic paint, & adding torn bits of cs which I had embossed & then painted with metallic paint in a bronze colour, I then painted & distressed the flowers (Alteration die) & stuck them down with the gem brads. The image is from Stampers Anon. & it was stamped with Versafine black ink & coloured using wc pencils. The image was stuck down using foam tape, & red rhinestones were added to the crown. The words were covered with DM.


Gothic arch #18's theme was "flowers", & I chose to paint my b'ground with turquoise acrylic paint. The flower images are by DARKROOM DOOR from THIS & THIS set. I stamped the flowers using black Versafine ink & covered them with CE powder. I then added a B & W strip of paper, & punched out a b'fly shape out of same paper. The sentiment is also from DD, from THIS set


So now that I'm caught up with the arches I might get started on my entry to this month's fun theme of "shoes" over at INKURABLE STAMPERS, there's lots of inspirational links there, so if you're stuck have a look HERE & join in. Get your stamps out & have a play : )
& don't forget to have a look HERE if you want to know how to make THIS quick banner card

& don't forget to visit the Flickr group page to see all the fantastic Gothic Arches, there's lots of very inspiring works there, enjoy :)

Gothic Arches #14 & #15

Here is my Gothic arch # 14 with the theme "Numbers" for the year-long Gothic arch challenge over at INKURABLE STAMPERS B'ground was stamped using foam stamps & acrylic paints, then each number was covered with DM, & red Marvy ink was sponged directly onto the b'ground. A piece of torn fabric was added & the image of the children (from Studio Astarte) was applied with foam tape. The sentiment is from THIS Darkroom Door set, & the wooden star button is from CRAFT QUEEN.


This is # 15 Gothic arch with the theme of "Keys" My arch shape was dry embossed using a TH folder, I then painted it with matallic paint, adding the cb heart shape (coloured with purple Stazon ink) The keyhole is from Collections, & I rubbed some brown & black ink onto it, & then rubbed some DM to give it the weathered look :) The key image is from THIS Darkroom Door set, & it has been stamped onto white cs with Versafine ink & covered with tapestry embossing powder, the sentiment is from Oxford Impressions.


Thanks for visiting, & don't forget to join in if you can : )


Monday, 6 September 2010

Gothic Arch #13


For my arch I started by painting the arch shape with a combination of bronze & viridian acrylic paints, I then added the torn-edged strip of card which I had stamped & heat-embossed using the script stamp (from THIS DD set) I also stamped & clear-embossed the word (from the same set) The Stampendous image was stamped, using black Archival ink, onto cs which I had been dabbed with different coloured Marvy inks. I added a little ds ribbon, & stuck the image on top using ds foam tape...
Now to catch up with numbers 14, 15, 16 & 17!!!!! LOL, Just like Melbourne weather, when it rains, it POURS!!
If you get the chance, have a look at all the Gothic arches in the Flickr group, lots of great inspiration, thanks for the visit & see you soon :) Off to load mine now :)

Friday, 23 July 2010

#11 & An ATC Box


This is my take on SARAH's Gothic arch challenge #11, paint, I actually got it done this past Monday, but I hadn't had a chance to photograph it until today. I started by covering my arch shape with an old book page, & giving that a light coating of MMs (lemon)acrylic paint with a dry brush. I then used a piece of bubble wrap & some red & orange acrylic paint for the background. I let it dry, & then stamped the Stampers Anon/Tim Holtz image of the umbrella man using Archival's ink, & covered the image with clear embossing powder, doing the same with the beautiful quote (an old one from Studio Astarte), & with the arch edges. Another arch done & dusted : )


& here is my entry for the current monthly challenge at INKURABLE STAMPERS. This month, SARAH has chosen a great colour combination for us to play with, & one I use LOTS!!!!
I started by working out my own template to make the pouch, to which I added a window by using one of my nesties, & covered the section with a piece of clear acetate. I then used some gold ink & a gold pen to do the edges, adding the Collections scroll, & the butterflies (from DARKROOM DOOR), which were stamped with Archival ink onto some sraps of previously painted (with purple & lime acrylic paint) watercolour paper, covering them with DM. I finished the piece with a word from a DD word strip, & some ribbon. I then got to work on a STAMPBORD tile, 3.5"x 2.5" ATC sized :) I used all DD stamps from various sets, Adirondack ink (lettuce) for the background & Archival ink for the images. If you've never had a chance to play with a Stampbord tile, have a look HERE for the basics, & HERE at my tutorial (sorry, I couldn't help myself LOL!)
I edged the tile with a gold pen, added some pearls & a word from a DD word strip. I really enjoyed doing this project, & it was made so much easier since I purchased one of THESE. I didn't measure a thing, I only worked using an ATC as a template, & guesstimated how much depth I needed. I think I'll be making a few of these in the not too distant future :)
As always, thanks for stopping by, & don't forget to join in & create something :)